Posted in Cardmaking

Charming Interactive Valentine

Today I am sharing a project I created featuring products from Simon Says Stamp. I posted this on Instagram as it is part of the To Be Loved hop. I hope you will hop along!

Products used:

~Always and Forever stamp set from Simon Says Stamp

~You Are cling stamp from Simon Says Stamp

~Heart Frames from Newton’s Nook Designs

How I created this:

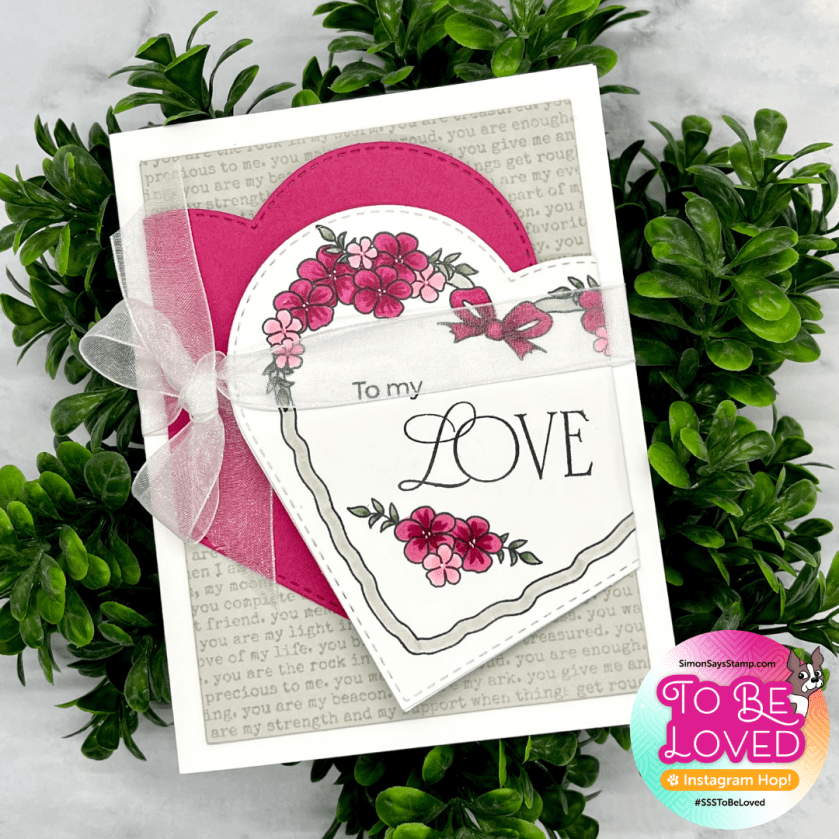
  1. I stamped the large heart image onto Hammermill 100# smooth card stock and colored it with Copic Markers.
  2. I die cut it using the stitched heart die from the Heart Frames die set. (There is a coordinating die for the Always and Forever set and this would work as well)
  3. I die cut a heart out of pink card stock and white card stock.
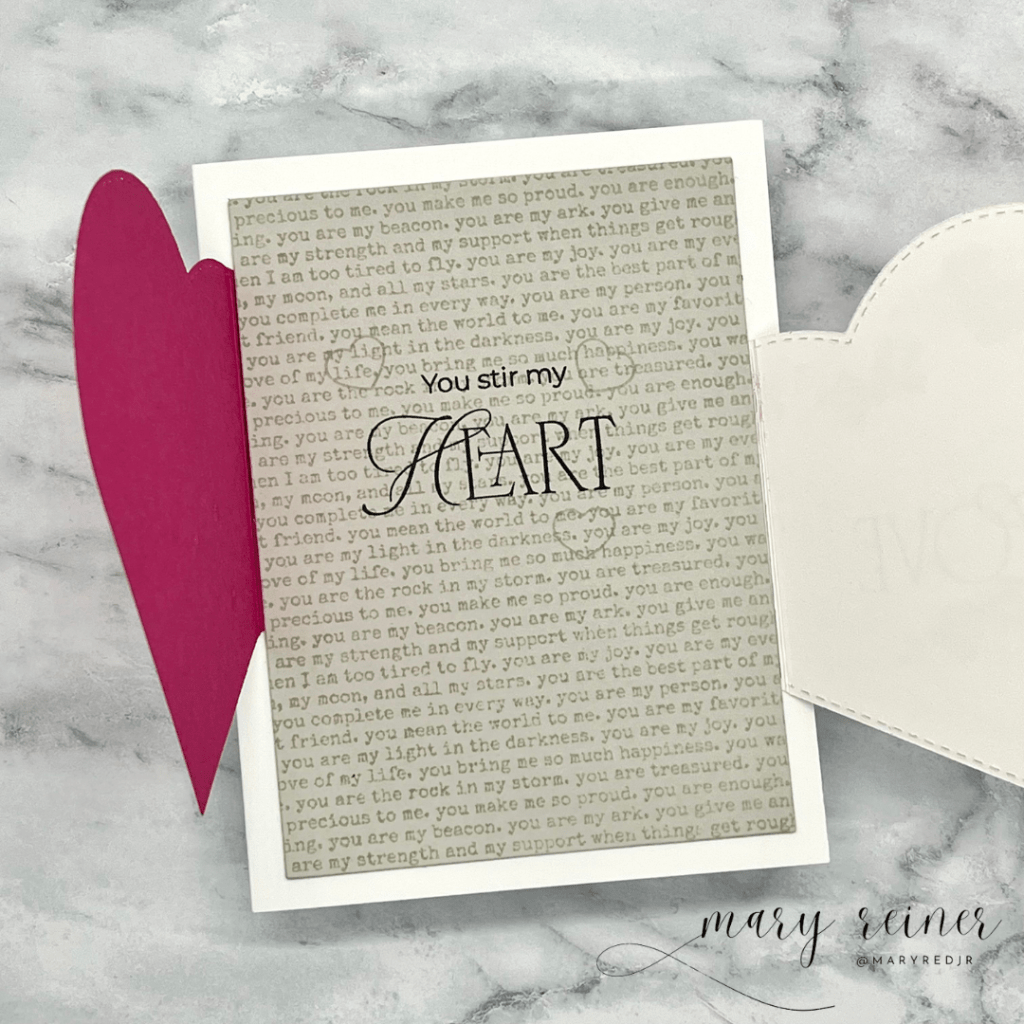
  4. I stamped the You Are stamp, using Pebble ink from Concord and 9th, onto Fog card stock. Then, I cut that down to 3 3/4″ x 5″.
  5. Next, I figured out where I wanted the hearts and lightly marked with a pencil where they would overlap on the Fog panel, so I could stamp th sentiment and have it be hidden by the hearts. I carefully erased the guides.
  6. I scored the hearts using a score board approx. 1″ from the right side on the white stamped heart and 1″ from the left side of the pink heart. (I really just eye-balled this as I wanted the hearts to be on an angle on the card.)
  7. I folded the scored hearts and adhered them to the back of the Fog panel. This created the interactive pieces. (see images below)
  8. I stamped the sentement onto the white heart to finish the front of the card.
  9. I added the third white heart to the back of the copic-colored, stamped heart. I cut part of the heart off since part of the stamped heart was folded behind the panel. This additional heart piece is just to cover up the ink that came through on my coloring.
  10. I adhered all of this to a top folding A2 card base, added a few white gel pen dots to the flower centers and finished it off with a sheer bow.

Be sure to comment on my Instagram post @maryredjr for a chance to win $25 to Simon Says Stamp.

Thanks for stopping by!

Posted in Cardmaking

Festive Fun Release from Simon Says Stamp

It is release day for Simon Says Stamp! Check out the whole new release here: https://www.simonsaysstamp.com/collections/festive-fun

Creating this cozy holiday card with the new Jolly Christmas stamp set was such a joy! The images and sentiments in this set are perfect for creating heartfelt Christmas cards.

Card Recipe:

~ Jolly Christmas stamp set

~ So Very Black card stock

~Glistening Snowflakes embossing folder

  1. Cut a 4 1/4″ x5 1/2″ panel from So Very Black card stock. Lightly spritz it with water and place it inside the embossing folder. Run it through your embossing machine.
  2. Using a light hand, gently rub a white pigment ink over the embossed panel.
  3. Stamp the image and sentiment onto white 100+ card stock.
  4. Color with Copic Markers or other alcohol markers.
  5. Cut the colored image down to 2 1/4″ x 3 1/2″
  6. Use an embossing pen to follow the lines of the snow. Use a glittery, white embossing powder and heat set.
  7. Adhere the stamped panel to the embossed black panel and then adhere that to an A2 card base.

I hope you are inspired to create some of your own holiday cards. If you would like to shop, I would appreciate you shopping through my link: https://shareasale.com/r.cfm?b=199868&u=3017887&m=24698&urllink=&afftrack=

For more card inspiration, head over to my Instagram @maryredjr

As always, thank you for stopping by!

Posted in Cardmaking

One Stamp Set, Three Ways

The Simon Says Stamp Cozy Hugs release is live! There are so many great products for your seasonal crafting.

I am featuring projects created with the Simon Says Stamp Batty for You stamp set. This stamp set has an adorable bat and several fun sentiments. I am so excited to share these projects with you!

Simon Says Stamps and Dies BATTY FOR YOU set568bf Cozy Hugs
from: Simon Says Stamp

Card #1

For my first project, I wanted to create a fun Halloween card. I began by stamping the bat parts out and then Copic Colored them. I used the following : 100, W8, W6, W5, W3 and R01. I did not have the dies, so I fussy cut my bat – It was super easy! I wanted to add some dimension, so I scored the wing along the printed lines, and gently folded them accordian style. I adhered the wings to the back of the bat body. I used a Sakura Black Glaze pen on his nose and Ranger Glossy Accents on the eyes to add some shine.

Next, I cut a 4.25 x 5.5 panel out of grey Kraft paper and ink blended around the edges with Ranger Black Soot Distress Oxide. I splattered Ranger Perfect Pearls to add some sparkle. I die cut stars and a moon out of metallic paper from my stash. I also cut a moon out of heavy black cardstock to layer behind the gold moon for dimension.

I played around with the layout of the card so I could determine where I wanted to stamp the sentiment. I stamped it, then adhered all of the elements to the background. Lastly, I adhered the whole panel to a top-folding A2 cardbase so it would be ready to mail.

I had so much fun creating the first card, I decided to make another one!

Card #2:

For my next project, I prepared the bat exactly as I did for the first project. I used the Simon Says Stamp Here for the Boos die for the sentiment. I die cut the words out of black cardstock, and the background out of purple cardstock. I left the whole purple die cut in tact, so I could layer the black wording on top of it. I love the added dimension this gives! I also adhered some foam tape behind the sentiment die cut and the bat so they would pop off the background.

Simon Says Stamp HERE FOR THE BOOS Wafer Dies sssd112218 – $8.99
from: Simon Says Stamp

For the background, I found some textured cardstock in my stash that I thought would look cool ink blended. I started with Speckled Egg Distress Oxide and then moved to Chipped Sapphire and finally, Villanous Potion. I went over these a few times to get the blend I wanted to acheive. Next, I die cut the panel with a Honey Bee Deckle Edge A2 die. I adhered it to a top folding, A2 panel and added my sentiment and bat die cuts. This card really came together quickly!

Project #3:

I love giving out a little something special to some of my favorite trick-or-treaters. So I decided to add the cute bat to some Halloween treats.

This time, all I did was stamp the bat parts with Versa Mark embossing ink and heat embossed with Brutus Monroe Alabaster embossing powder. (Glow in the dark embossing powder would be really fun for this too!)I fussy cut the bats again and folded the wings (I scored on the back of the wings so I wouldn’t mess up the embossing) for dimension. Then, I added googly eyes for some extra fun. Lastly, I adhered the bats to the candy with a pop dot. Don’t they look fun in the candy dish?!?

I hope this gave you some inspiration for creating your own Halloween creations with this new set from Simon Says Stamp.

For more card inspiration, please follow me on Instagram @maryredjr

Thanks for visiting!

Posted in Uncategorized

Thank You, Mr. Postman!

Did you know that July 1st is National Postal Worker Day? I just found this out a couple of weeks ago. It celebrates and recognizes postal workers and the hard work they put in to ensure your mail and deliveries arrive to you safely. I don’t know about you, but I really appreciate my mail carrier. I LOVE it when he brings me packages❤️

This is the card I created to participate in the July Wacky Holidays Hop!

Welcome to the July Wacky Holidays Hop! You know all those obscure things that earned themselves national days of recognition? We’re here to celebrate them! Who says only the major holidays get cards?!

This hop takes place on the first Saturday of each month on Instagram and we’d love to have you join us! DM @claires_card_on for all the info.

Please hop along with me and the below participants on Instagram as we celebrate all things July!
@claires_card_on
@emiliescardcreations
@handmadebykanicky
@joyinthemakingco
@kellyannsanti
@magymakes
@love.builds_up.crafts
@madewithlovebyterri
@craftwithme101
@withlovebyamy
@maryredjr
@rp_shutterbug
@savyakala
@plum_trillium
@kellys.craft
@vr_handmadelove

I am also submitting this to the My Favorite Things color challenge #192.

Don’t you just love the colors of this challenge?!

To create this card, I used a retired stamp set called “You’ve Got Mail” from My Favorite Things.

I hope this post reminds you to thank your postman!

Posted in Uncategorized

Growing In Unity : Day 2

One of the things I love most about Unity Stamps is their sentiments. I love the variety of themes and fonts that can be found. I can always count on Unity to provide the perfect sentiment.

I made this card for a friend who always amazes me with her strength and courage. Her young son has brain cancer and every four months he has to be scanned to make sure the cancer hasn’t returned. I can only imagine the anxiety and fear she faces! I wanted to make a card to encourage her.

For this card, I used two stamp sets: “Planted” and “Stay Strong.”

I started by stamping my image in Momento Tuxedo Black Ink because it is a Copic friendly ink. Next, I colored the trees very simply, with the Copic colors YG63, YG95, and G99. I love how the graphic these trees are! I thought this image lent itself to a square shaped card, so I cut it out in a square and also die cut a green frame using the Newton’s Nook square stitched die. I adhered these to a larger square card base and used a corner rounder on the bottom corners of my card.

Then, I stamped the sentiment with the same black ink and die cut it with a stitched rectangle. I added some foam tape to the back of the sentiment to add a bit of dimension to my card.

Finally, I added some neutral twine for a little texture.

A simple card can make a big impact on the recipient…especially when the sentiment is encouraging.

I hope you will leave a comment for a chance to win some Unity goodies!

And if you’d like to see more of my card creations, please follow me on Instagram @maryredjr .