Posted in Cardmaking

It’s STAMPtember!

It’s the most wondeful time of the year! Get ready for a month-long celebration of stamping, inspiration, and community. I can’t wait to share what we’ve been working on!

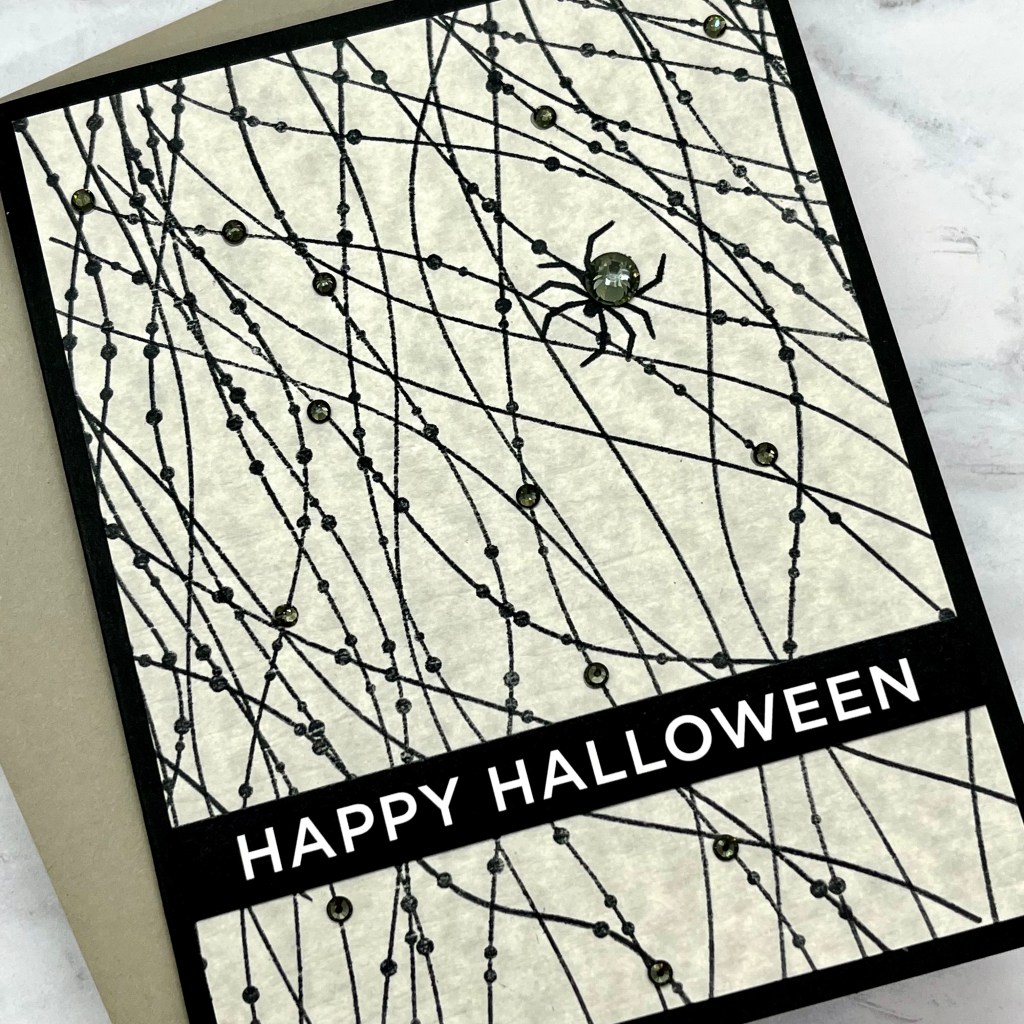
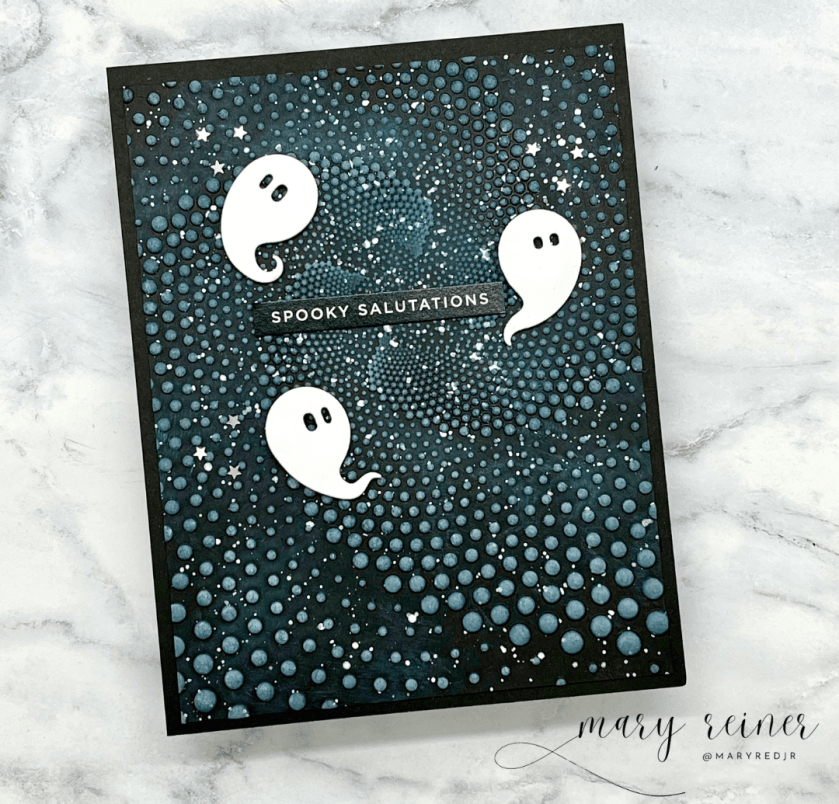
Today’s card features two new products from Simon Says Stamp: Haunted Pumpkin die set and Dotted Spiral embossing folder. I loved combining these two new products to create this spooky card.

Step 1: Create the Background

Cut a piece of black cardstock to 5 1/2″ x 4 1/4″. Lightly spritz the cardstock with water, place inside the embossing folder and run it through your die cutting machine. Be sure to use the proper “sandwich” for a 3D embossing folder.

Next, splatter the embossed piece with Pawsitively Perfect White Splatter Medium. Set aside to dry.

Using a white pigment ink pad, gently run it across the top of the black embossed panel. Be careful to not push hard on the ink pad – you just want the raised areas to get inked.

Step 2: Diecutting

Die cut 3 ghosts from white cardstock. If you want to add more dimesion, die cut a couple extra of each ghost and stack them together with liquid adhesive.

Trim the black embossed panel to 5 1/4″ x 4″. Cut another piece of black cardstock to 5 1/2″ x 4 1/4″.

Choose a sentiment from the Spooky Salutations Reverse Sentiment Strips (or anothere set) and trim it out. Color the white edge of the strip with a black marker.

Step 3: Assemble Card

Adhere the black embossed panel to the center of the larger black panel. Adhere the sentiment to the center of the spiral pattern. Next, adhere the ghosts around the sentiment. Add a few silver sequins or stars to add a little more sparkle. Lastly, adhere the whole thing to an A2 card base.

Super quick and spooky cute!

Be sure to check out the entire new STAMPtember release here: https://www.simonsaysstamp.com/collections/stamptember

Simon Says Stamp is having a huge Instagram party tomorrow! Lots of freebies and tons of inspiration. See you there!

Thanks for stopping by!!

Posted in Cardmaking

Sweet Wishes Blog Hop

Hello! I’m so glad you are hopping along. Simon Says is generously giving away a $25 coupon to a lucky commentor on this post. ALSO, use the code FYCHR to get the Tidings of Cheer die for FREE with any purchase (see graphic above).

Today, I am sharing a card I created using some brand new products from the Sweet Wishes release from Simon Says Stamp.

I used the following products to create my card:

~Sparkle Strands clear stamp set – This versatile stamp adds a whimsical and delicate touch to your projects. Ideal for creating simple, elegant backgrounds. I stamped this multiple times to acheive a web-like look.

~Pawsitively Dazzling Gunmetal Gems – To give the web a bit of sparkle, I scattered Gunmetal gems across the strands, making it look like morning dew got caught on spider’s web. I also added a larger gem to the body of the spider. (The spider is from the Spooky Windows stamp set) These gems add a subtle yet dazzling shine.

~So Very Black Card Stock – For dramatic contrast, I used So Very Black card stock as the card base. This really makes the stamped web and gems pop! I LOVE this new card stock!

~CZ Design Sentiment Strips Reverse Halloween – To complete the card, I added a simple Happy Halloween sentiment strip. These are a great way to finish off any card!

I really want to emphasize the versatility of this stamp set, so I also created a peaceful holiday card.

For this card, I stamped the strands in Surf Pawsitively Saturated Ink and added Ranger Stardust Stickles. The sentiment is the newly released Fancy Peace wafer die set. This card has a completely different vibe than the Halloween card above.

Your next stop on the hop is Anne Fiene. In case you missed the list:

Simon Says Stamp Blog 
Nina-Marie Trapani
Caly Person
Suzy Plantamura
Emily Midgett
Amy Rysavy
Debby Hughes
Lisa Addesa
Alberto Gava
Kulbir Kirkland
Heather Hoffman
Allison Frazier
Maura Hibbitts
Misty Elam
Mary Reiner
Anne Fiene

I hope this inpires you to experiment with your stamps and figure out new ways to use them. Make sure you check out all of the inspiration shared yesterday as well! Don’t forget to leave a comment for your chance to win and shop the new release here https://shareasale.com/r.cfm?b=199868&u=3017887&m=24698&urllink=&afftrack= and get your free die too. Happy shopping!

Posted in Cardmaking

One Stamp Set, Three Ways

The Simon Says Stamp Cozy Hugs release is live! There are so many great products for your seasonal crafting.

I am featuring projects created with the Simon Says Stamp Batty for You stamp set. This stamp set has an adorable bat and several fun sentiments. I am so excited to share these projects with you!

Simon Says Stamps and Dies BATTY FOR YOU set568bf Cozy Hugs
from: Simon Says Stamp

Card #1

For my first project, I wanted to create a fun Halloween card. I began by stamping the bat parts out and then Copic Colored them. I used the following : 100, W8, W6, W5, W3 and R01. I did not have the dies, so I fussy cut my bat – It was super easy! I wanted to add some dimension, so I scored the wing along the printed lines, and gently folded them accordian style. I adhered the wings to the back of the bat body. I used a Sakura Black Glaze pen on his nose and Ranger Glossy Accents on the eyes to add some shine.

Next, I cut a 4.25 x 5.5 panel out of grey Kraft paper and ink blended around the edges with Ranger Black Soot Distress Oxide. I splattered Ranger Perfect Pearls to add some sparkle. I die cut stars and a moon out of metallic paper from my stash. I also cut a moon out of heavy black cardstock to layer behind the gold moon for dimension.

I played around with the layout of the card so I could determine where I wanted to stamp the sentiment. I stamped it, then adhered all of the elements to the background. Lastly, I adhered the whole panel to a top-folding A2 cardbase so it would be ready to mail.

I had so much fun creating the first card, I decided to make another one!

Card #2:

For my next project, I prepared the bat exactly as I did for the first project. I used the Simon Says Stamp Here for the Boos die for the sentiment. I die cut the words out of black cardstock, and the background out of purple cardstock. I left the whole purple die cut in tact, so I could layer the black wording on top of it. I love the added dimension this gives! I also adhered some foam tape behind the sentiment die cut and the bat so they would pop off the background.

Simon Says Stamp HERE FOR THE BOOS Wafer Dies sssd112218 – $8.99
from: Simon Says Stamp

For the background, I found some textured cardstock in my stash that I thought would look cool ink blended. I started with Speckled Egg Distress Oxide and then moved to Chipped Sapphire and finally, Villanous Potion. I went over these a few times to get the blend I wanted to acheive. Next, I die cut the panel with a Honey Bee Deckle Edge A2 die. I adhered it to a top folding, A2 panel and added my sentiment and bat die cuts. This card really came together quickly!

Project #3:

I love giving out a little something special to some of my favorite trick-or-treaters. So I decided to add the cute bat to some Halloween treats.

This time, all I did was stamp the bat parts with Versa Mark embossing ink and heat embossed with Brutus Monroe Alabaster embossing powder. (Glow in the dark embossing powder would be really fun for this too!)I fussy cut the bats again and folded the wings (I scored on the back of the wings so I wouldn’t mess up the embossing) for dimension. Then, I added googly eyes for some extra fun. Lastly, I adhered the bats to the candy with a pop dot. Don’t they look fun in the candy dish?!?

I hope this gave you some inspiration for creating your own Halloween creations with this new set from Simon Says Stamp.

For more card inspiration, please follow me on Instagram @maryredjr

Thanks for visiting!

Posted in Uncategorized

Drink Up Witches

I have been having so much fun creating cards with products from The Rabbit Hole Designs !

This Halloween card features the adorable witch from the Cocktail Witch stamp set. I colored her earlier in the month as part of #thedailymarker30day coloring challenge. I colored with Copic markers and a little bit of Prismacolor colored pencils. I used the coordinating dies to cut out my witch.

For my background, I wanted to use the newly released Cat Eye Stencil. To start, I ink blended Black Soot and Blueprint Sketch Distress Oxides onto Hammermill 110# white card stock to create a night sky. I used a circle mask to create the moon. Next, I splattered Confetti White Perfect Pearls to add some stars. Then, using a sponge dauber on my stencil, I used versamark embossing ink. I decided to use clear embossing powder to add shine. Lastly, I used Distress Oxide inks in Squeezed Lemonade, Mustard Seed and a bit of Carved Pumpkin to color the moon. I love how this background turned out!

To finish the card, I added the sentiment and embossed with silver sparkle embossing powder. I thought the silver looked good with the splattered stars.

Halloween cards are so fun to create. I hope my card inspires you to create some spooky cards!