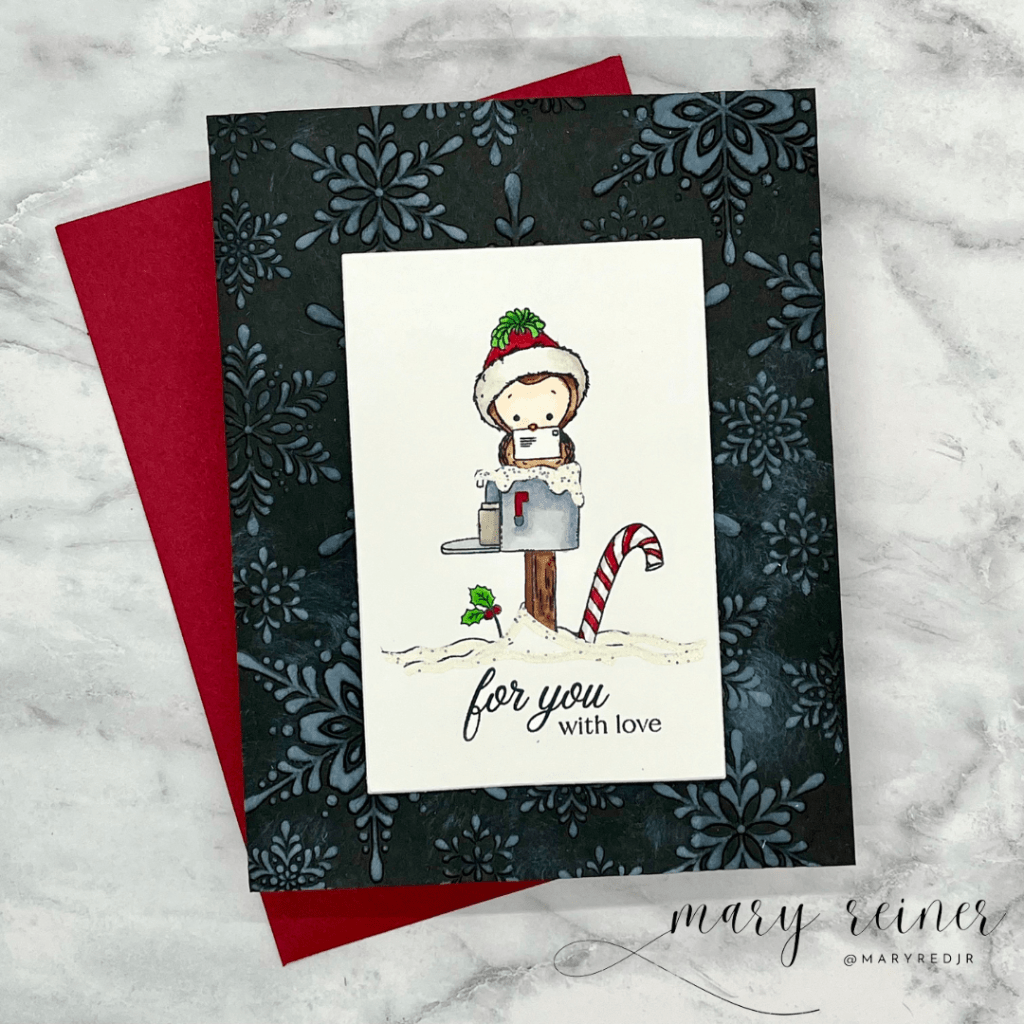
Creating this cozy holiday card with the new Jolly Christmas stamp set was such a joy! The images and sentiments in this set are perfect for creating heartfelt Christmas cards.
Card Recipe:
~ Jolly Christmas stamp set
~ So Very Black card stock
~Glistening Snowflakes embossing folder
Cut a 4 1/4″ x5 1/2″ panel from So Very Black card stock. Lightly spritz it with water and place it inside the embossing folder. Run it through your embossing machine.
Using a light hand, gently rub a white pigment ink over the embossed panel.
Stamp the image and sentiment onto white 100+ card stock.
Color with Copic Markers or other alcohol markers.
Cut the colored image down to 2 1/4″ x 3 1/2″
Use an embossing pen to follow the lines of the snow. Use a glittery, white embossing powder and heat set.
Adhere the stamped panel to the embossed black panel and then adhere that to an A2 card base.
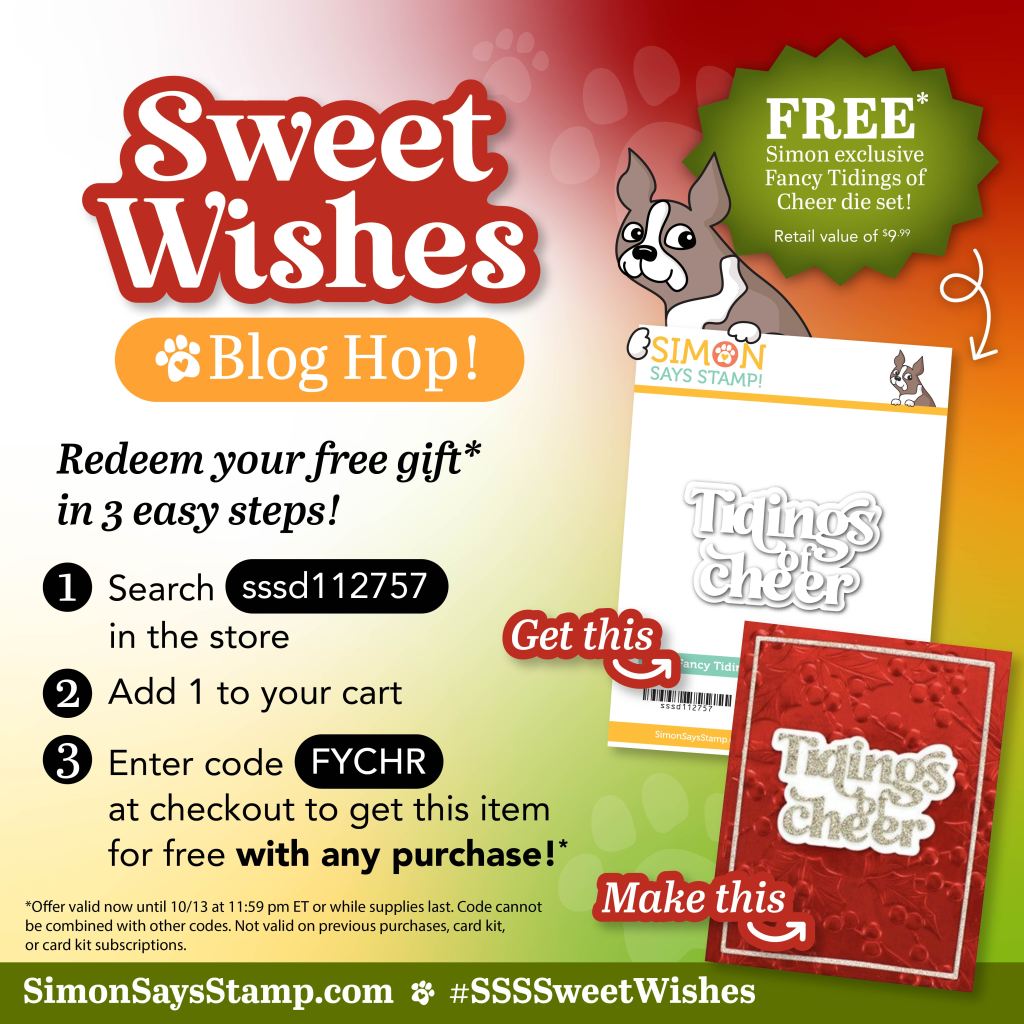
Hello! I’m so glad you are hopping along. Simon Says is generously giving away a $25 coupon to a lucky commentor on this post. ALSO, use the code FYCHR to get the Tidings of Cheer die for FREE with any purchase (see graphic above).
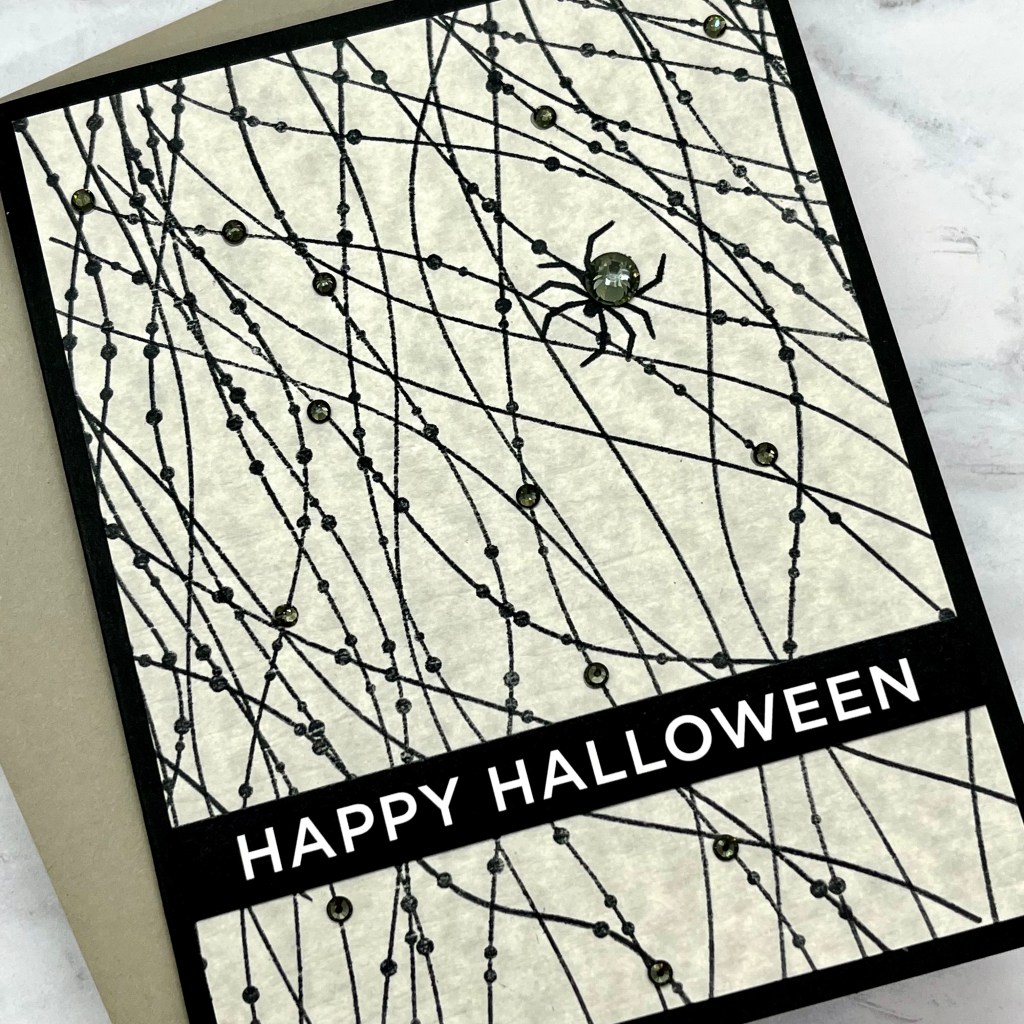
Today, I am sharing a card I created using some brand new products from the Sweet Wishes release from Simon Says Stamp.
I used the following products to create my card:
~Sparkle Strands clear stamp set – This versatile stamp adds a whimsical and delicate touch to your projects. Ideal for creating simple, elegant backgrounds. I stamped this multiple times to acheive a web-like look.
~Pawsitively Dazzling Gunmetal Gems – To give the web a bit of sparkle, I scattered Gunmetal gems across the strands, making it look like morning dew got caught on spider’s web. I also added a larger gem to the body of the spider. (The spider is from the Spooky Windows stamp set) These gems add a subtle yet dazzling shine.
~So Very Black Card Stock – For dramatic contrast, I used So Very Black card stock as the card base. This really makes the stamped web and gems pop! I LOVE this new card stock!
I really want to emphasize the versatility of this stamp set, so I also created a peaceful holiday card.
For this card, I stamped the strands in Surf Pawsitively Saturated Ink and added Ranger Stardust Stickles. The sentiment is the newly released Fancy Peace wafer die set. This card has a completely different vibe than the Halloween card above.
Your next stop on the hop is Anne Fiene. In case you missed the list:
I hope this inpires you to experiment with your stamps and figure out new ways to use them. Make sure you check out all of the inspiration shared yesterday as well! Don’t forget to leave a comment for your chance to win and shop the new release here https://shareasale.com/r.cfm?b=199868&u=3017887&m=24698&urllink=&afftrack= and get your free die too. Happy shopping!
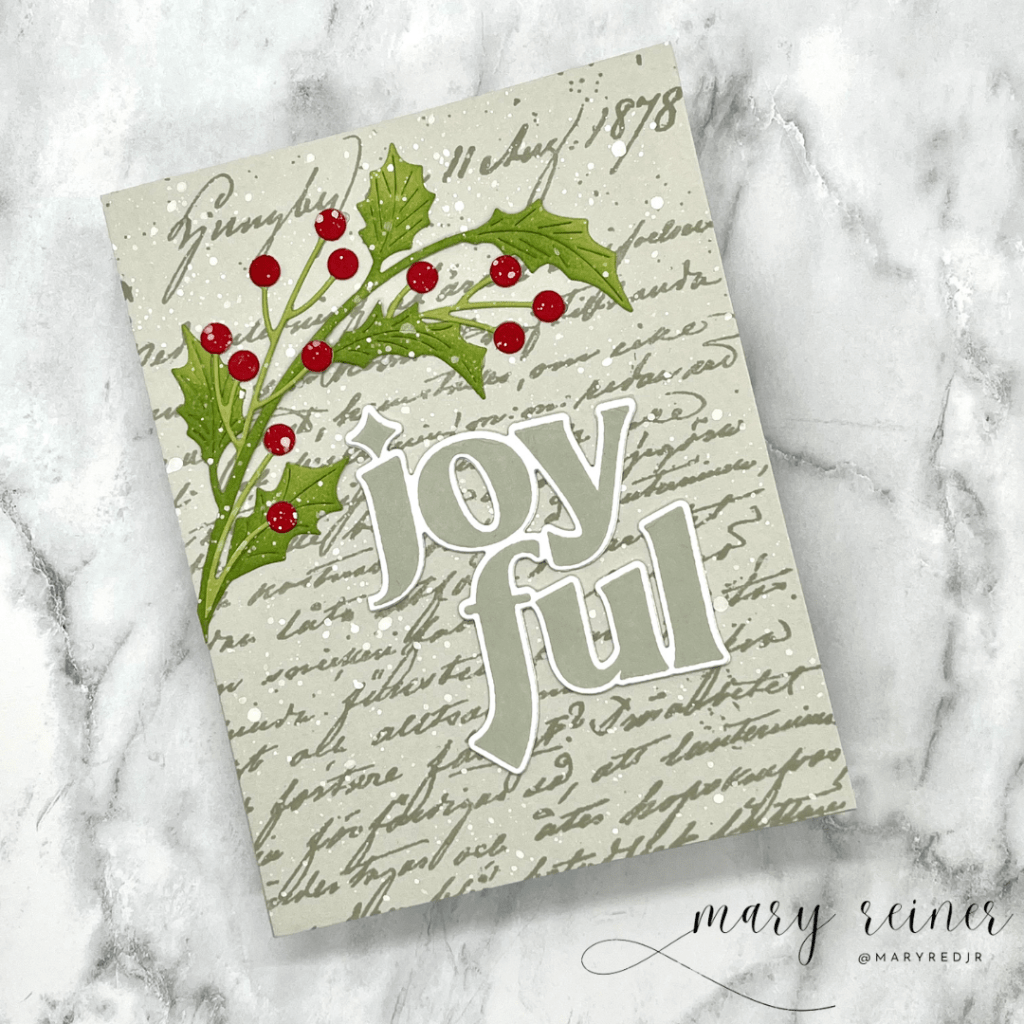
Welcome back! In a world that could always use a little more positivity, we are thrilled to introduce our latest release: Cheering for You. Join us as we unveil products designed to inspire and uplift. I will be sharing a couple of products from this new release from Simon Says Stamp.
How pretty is this background? It was created using the newly released Old Letter cling stamp and white pigment ink. I have a feeling I will be using this a bunch for backgrounds. I love the subtle writing!
And I couldn’t help myself…I had to create a holiday card, too. This time I stamped it in Cozy ink onto Fog card stock. I absolutely love how this one turned out.
I was also sent a set of acetate cards. I really like them! High quality and already folded and ready to go. These would be a fun addition to your card stock stash.
I will admit, these are hard to photograph! But in real life, this looks really pretty. I added another oval die cut to the back of the card for write my message on. I think the recirient will think this is a unique card.
All of the products used to create my cards are from SImon Says Stamp:
It’s that time again. Time for another awesome release from Simon Says Stamp!
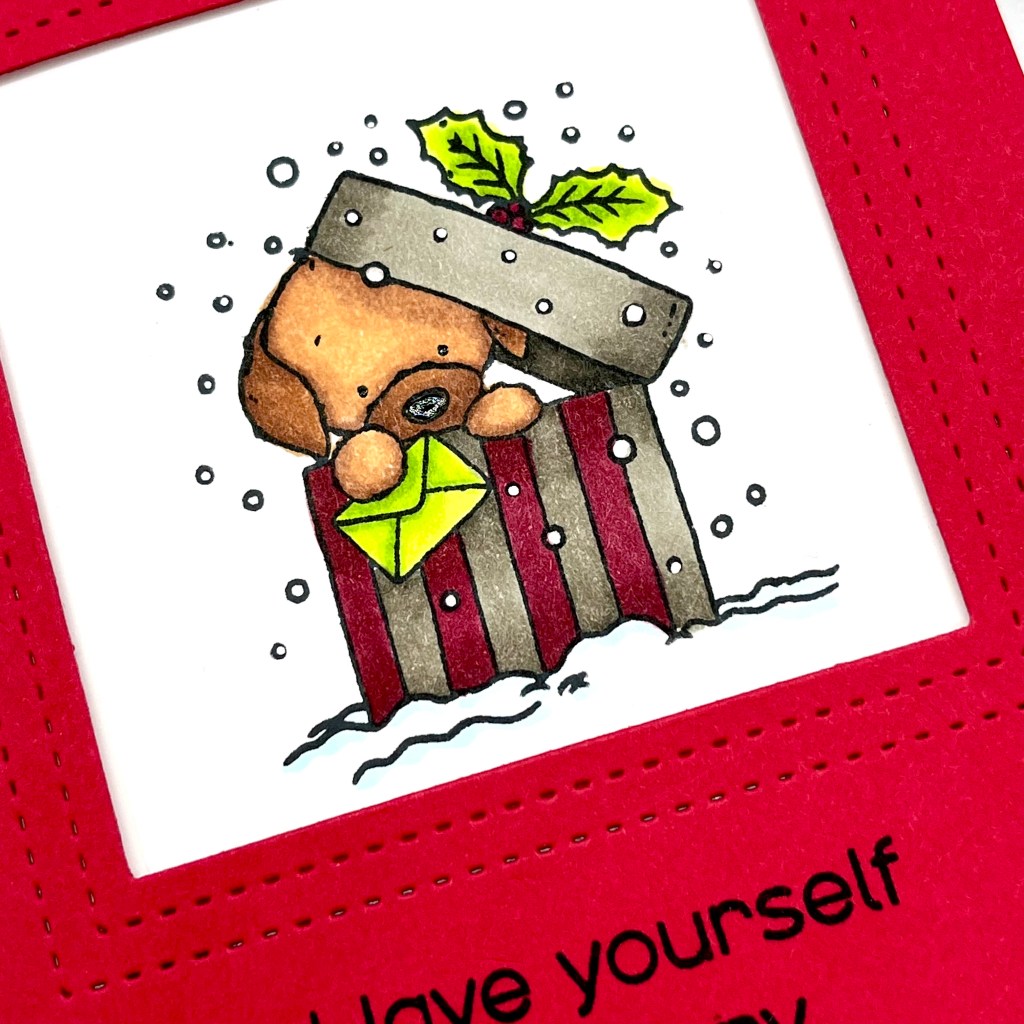
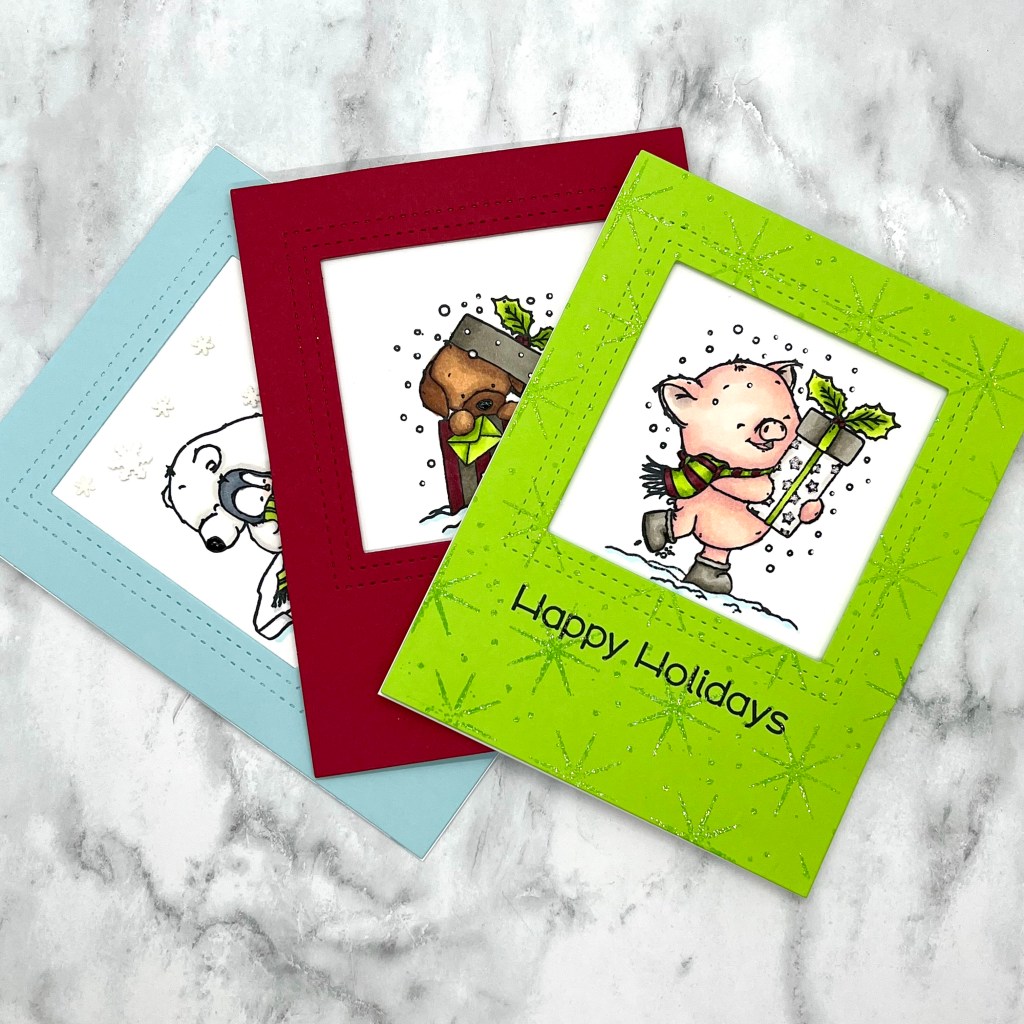
I was fortunate to receive the adorable Wintertime Critters stamp set to create with. I decided to use the same layout for all my cards, just stepping it up a bit each time. There are several cute images and lots of holiday sentiments in this set for your cardmaking. The images are fun to color and you can create a card quickly with them. Dies are available as well.
Card #1:
For this card, I stamped the dog image and colored him with Copic Markers. I colored the nose and dotted the eyes with a Sakua Black Glaze pen. I also used a white gel pen to fill in the snow flakes. Then, I die cut a red panel using Lawn Fawn’s Outside In Stitched Square stackable dies. But you could use any stitched square to acheive a similiar look. I stamped the sentiment onto the red panel and added foam tape to the back for dimension. I adhered the red panel to the white panel and added it to a top folding A2 card base.
Card #2:
For this card, I did some very simple Copic Coloring and once again colored the nose with the Black Glaze pen. This card was made exactly like the previous card, except I added some Trinity Stamp clay snowflake sprinkles to add some texture to the card.
Card #3:
I stepped up my final card by adding some sparkle to the background. To achieve this, I stamped the Simon Says Stamp Star cling stamp with embossing ink and sprinkled on Ranger embossing powder. I used my heat tool to melt the powder and I love the shine this added to my card. This little piggy likes the glitter too!
Three cards – one layout – stepped up a bit each time.
Which one is your favorite?
I hope you’ll head over and check out the entire new release! I have included my affiliate link for you to the shop.
It sure is hard to believe that it is already December! But, we all have lots to look forward to – like DieCember at Simon Says Stamp!
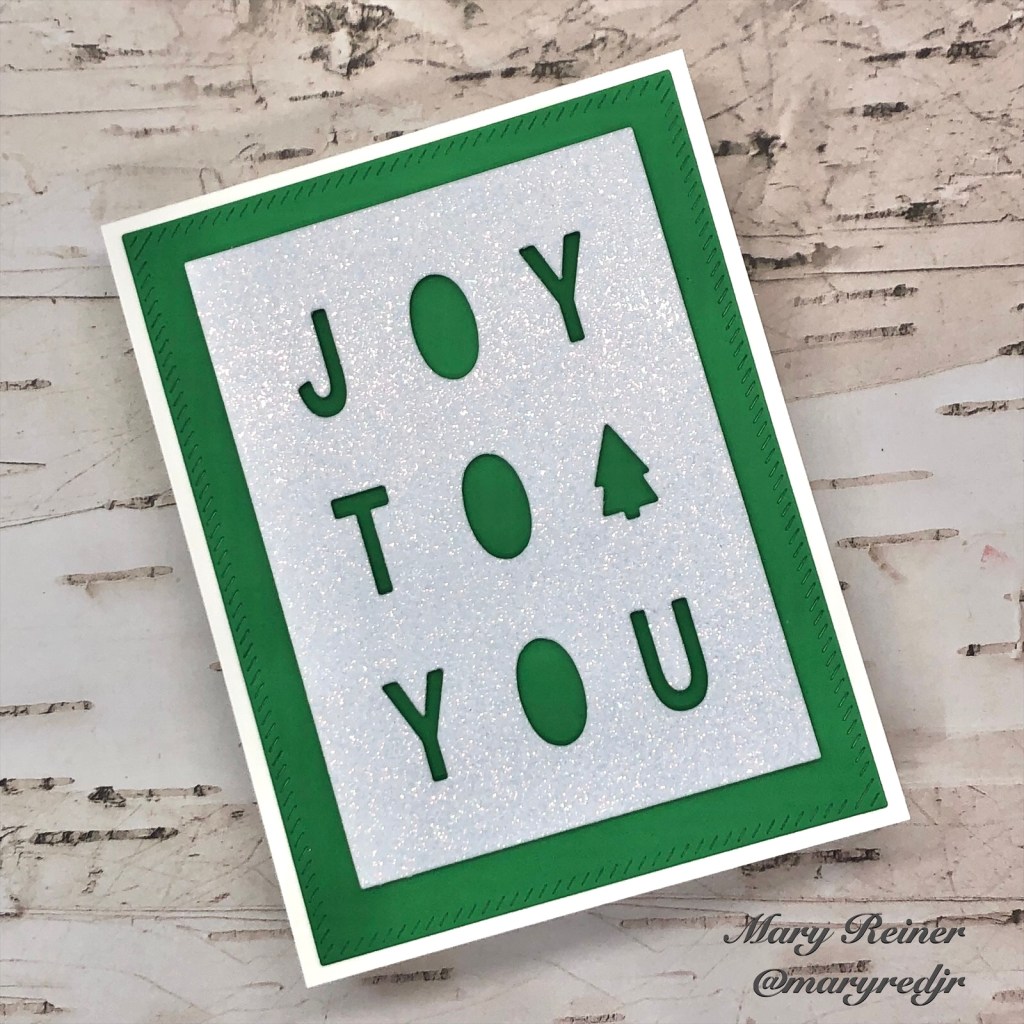
I was thrilled to get the chance to create with this new die from Simon Says Stamp “Joy to You” cover plate. I made several cards and a fun banner.
For my first card, I started by using the cover plate to die cut some deep, red cardstock. I splattered white acrylic paint to add snow to my background. Next, I die cut green cardstock so I could inlay a green tree on this card. I layered it onto a white panel and adhered it to a white, top folding A2 card base.
For this card, I used the letters from the previous card to determine my color palette. I found some pretty plaid patterned paper in my stash that I thought would work perfectly for this card. I used the cover plate to die cut some white cardstock. Next, I inlayed the red letters. I also used the cover plate to die cut some silver paper so I could get a silver tree to inlay. This was such a quick card to create, and I love how it turned out!
This next card really came together quickly! I die cut the cover plate from Simon Says Stamp silver glitter cardstock. Next, I added foam tape to the back, to give this panel some dimension. I die cut a green panel and adhered it to a white, top-folding A2 card base. Lastly, I adhered the silver panel. So sparkly and pretty!
This card is probably my favorite. I simply die cut the cover plate 3 times out of white cardstock. I adhered them all together and then rubbed the edges onto my embossing ink pad. Next, I sprinkled gold embossing powder and heat embossed the edges. Then, I splattered Lawn Fawn Liquid Stardust on the base panel. I adhered the die cut panel to the base panel and added them to a top-folding A2 card base. Lastly, I inlayed a green tree. I love how this card turned out!
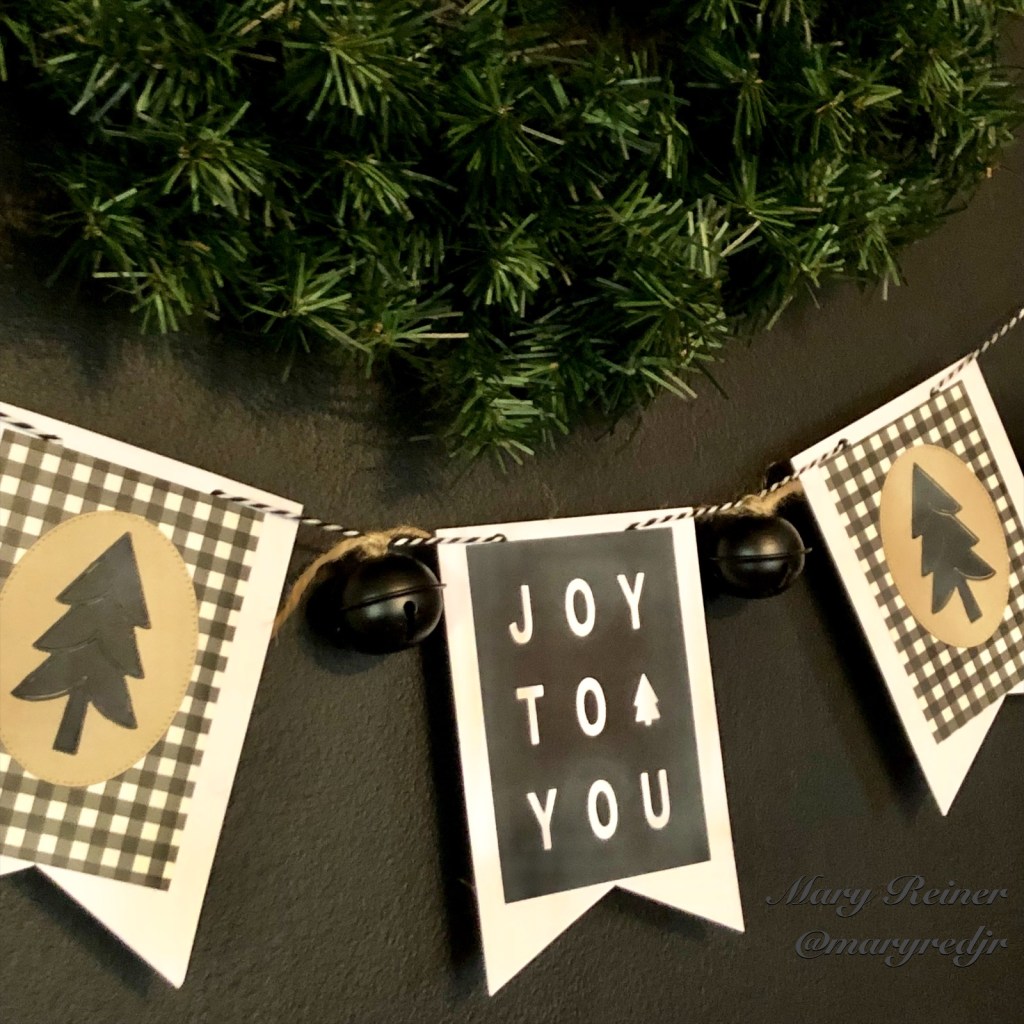
For my last project, I created a fun little banner for my chalkboard wall. I was going for a rustic, farmhouse vibe. I die cut the cover plate from black cardstock and used a dauber to add some Ranger Picket Fence Distress Ink on it to make it look a little chalky. I adhered that panel to a banner shape that I created.
To create the banner shape, I cut a piece of white card stock to 4 x 5 3/4″. I found the center and measured up one inch from the bottom and drew a small dot where that measurement met the middle. Using an xacto knife, I cut from each of the bottom corners, diagonally up to where the dot was located, to make the banner shape. I cut several of these for the banner.
For the other banners, I die cut an oval out of kraft cardstock and adhered it to a gingham rectangle that was adhered to the banner piece. I die cut black trees using Simon Says Stamp Mod Tree Wafer Die and adhered them to the kraft ovals. Next, I punched holes so I could string up the banner. I added black jingle bells (which I found in the Target Dollar Spot) between the banners. I hung this on my chalkboard wall in my kitchen and I am loving it!
I hope you will consider Joy For You Cover Plate Die for your holiday crafting. I think it is a must have for creating quick and simple cards!
Thank you for your support. Click the link below to shop my affiliate link. I only use and recommend products I love. I was not paid to do this post. All products were personally purchased except for the Simon Says Stamp Joy to You Cover Plate die which was provided by the company.
How fun is the Fall/Winter Coffee Lovers Blog Hop? So many wonderful cards entered. I hope you are joining in!
I decided to create a holiday card, because it is time to get busy!
My card features an image from Cozy Vibes Coffee from Unity Stamps. I colored it with Copic Markers and went back in with the colorless blender to remove some of the color from the latte design. I also added some white gel pen to brighten it up. The sentiment is from Christmas Coffee Sayings by Impression Obsession. I stamped it with Momento Tuxedo Black Ink and then die cut it with a pennant die from Divinity Designs. I used some older punches to create my holly and pine accents. I splattered some white paint on the holly and pine to look like snow.
I’m linking this up to the Coffee Lovers Blog Hop and also entering it in the current Caffeinated Christmas Card challenge #cccc11.
I look forward to seeing your caffeinated creations!
I don’t know about you, but I really need to get a jump on my holiday cards. Every year I say I’m going to do it…but rarely do I actually fulfill it. This year I am teachig a class at the local papercrafting store and the theme for this month is Christmas in July. Lucky for me, I don’t have a choice but to start working on holiday cards.
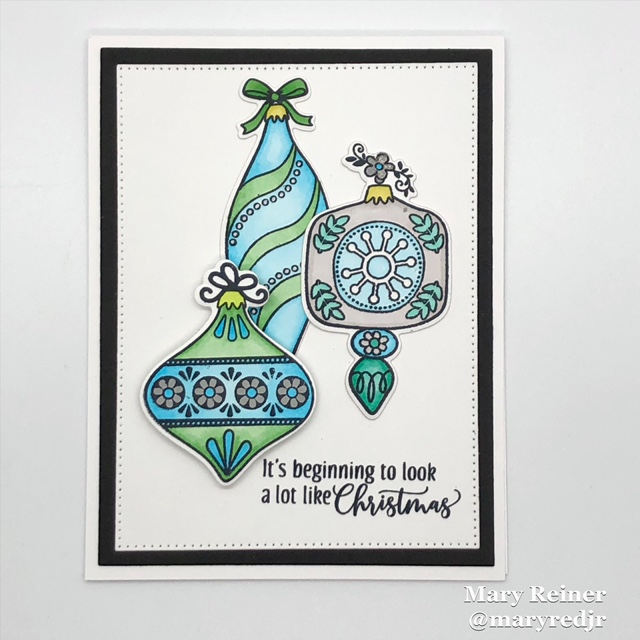
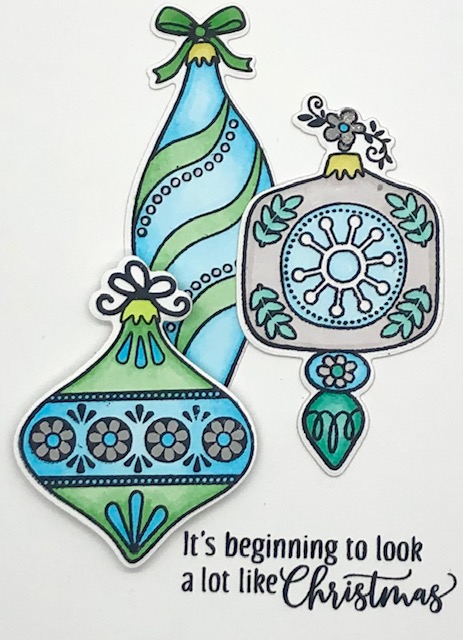
This card features a wonderful stamp set from Dare2BArtzy. It is called Deck the Halls. I love the images as well as the sentiments.
For my card, I decided to go with a clean and simple layout. I really like how this one turned out! For my class, I thought it was a good card for students to practice their coloring skills by coloring the ornaments. Also, they could go with any color combination they chose, since the rest of the card is black and white.
For my ornaments, I colored with Spectrum Noir Tri Blend markers. I like how simple they are to use and that they take the guess work out of finding colors to blend together. I also added some silver gel pen details to the ornaments to make them even more festive. To give dimension, I added a cardstock layer to the square ornament and then a pop dot to the ornament in the foreground.
I hope this inspires you to start creating your holiday cards!
It’s hard for me to believe that this week is Thanksgiving. And I can’t believe my GIU week has finally arrived! I am so thrilled to get to share some of my ideas with you.
I thought I’d kick off my GIU week with some holiday inspiration.
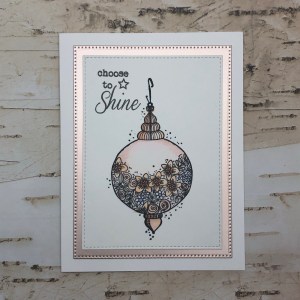
This card was created using a kit of the month “Conspiracy of Love” from October 2017.
I stamped this pretty image in Momento Tuxedo Black Ink and colored with Copic markers. I wanted to go with some non traditional colors for this card. Next, I went over the image with clear Wink of Stella to add some sparkle and shine. I heat embossed the sentiment with Ranger Watering Can embossing powder and then cut out the panel. My original idea was to make a slimline card, but then I changed my mind and went with a standard 4 1/4 x 5 1/2” top folding card base. The layering panel is cut from Tonic Mirror Card in Burnished Rose. Isn’t that cardstock gorgeous?!? I’ve been hoarding that paper for a while but thought it would be pretty with these ornaments. Before adhering my stamped panel, I glued some white craft foam to the back to add some dimension to my card.
If you look closely, you’ll see the Wink of Stella.
I liked how this card turned out, so I decided to make another card. I followed a similar process, but I just stamped my sentiment on this version. This image is from the October 2018 kit of the month “All Winter Long” and the sentiment is from “Shine Bright Girls.”
I really like the soft, non-traditional colors and clean design of these cards.
I hope you will create some holiday cards this week. I know I still have lots to make!
Did you know that just by commenting on this blog post you might win some Unity goodies? I mean, who doesn’t want some free stamps, right?!?
I hope you’ll stop by tomorrow to see what I have to share!