Posted in Papercrafting

How to Create a Magnetic Bookmark

Have you checked out the new release from Simon Says Stamp? There are so many fun products and many of them are geared towards Valentine papercrafting.

I had the opportunity to play with one of the new die sets – Love City. As soon as I saw it, I thought it would make a great magnetic bookmark. Here is how I created it.

Supplies needed:

~Love City die set from Simon Says Stamp

~3 or 4 different colors of cardstock

~thin magnetic material (can be repurposed or new – I used some packaging from Simon Says Stamp)

~Liquid glue and/or adhesive tape

Step one:

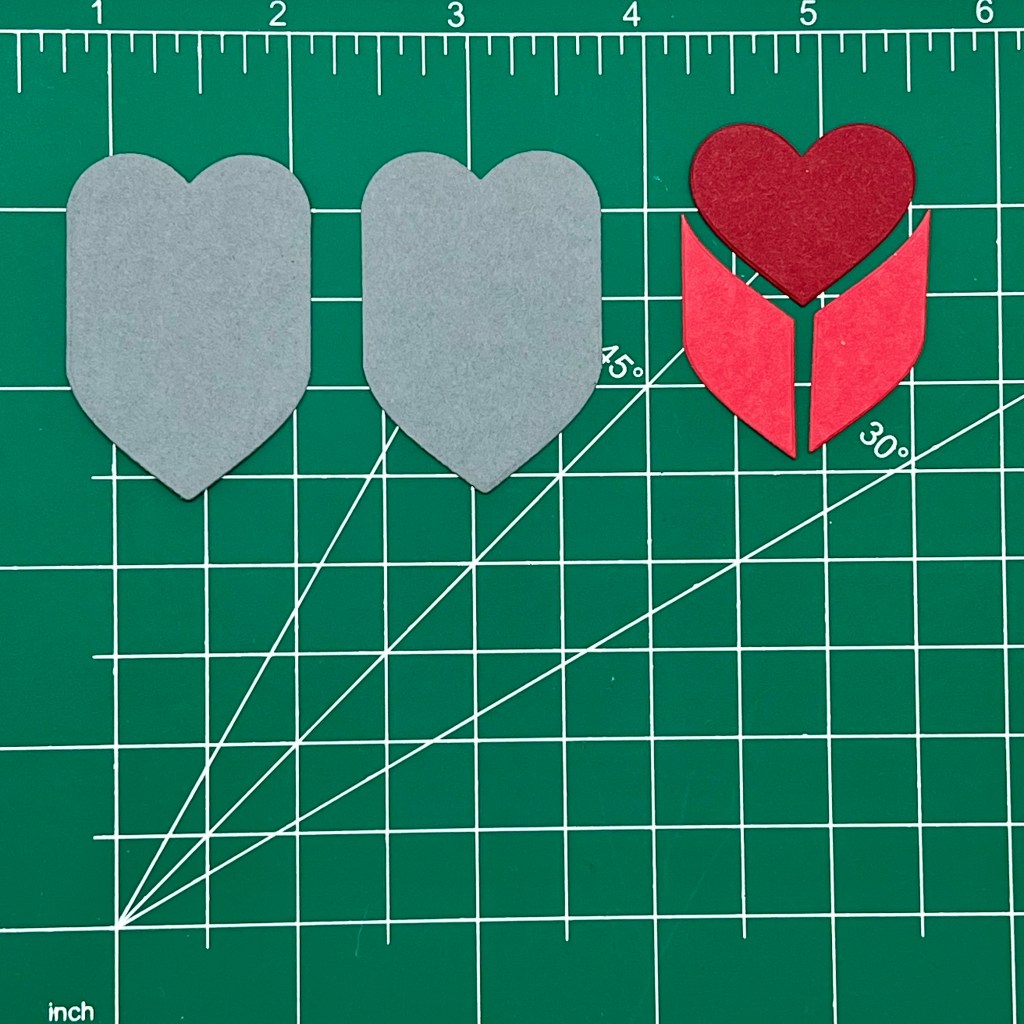
Die cut two of the base pieces and one set of the heart and sides. I would recommend using a lighter weight cardstock for the back base piece of the bookmark. You can use whatever color combination you like. I made several of these, in lots of colors and all of them looked cute. You really cannot go wrong.

Step two:

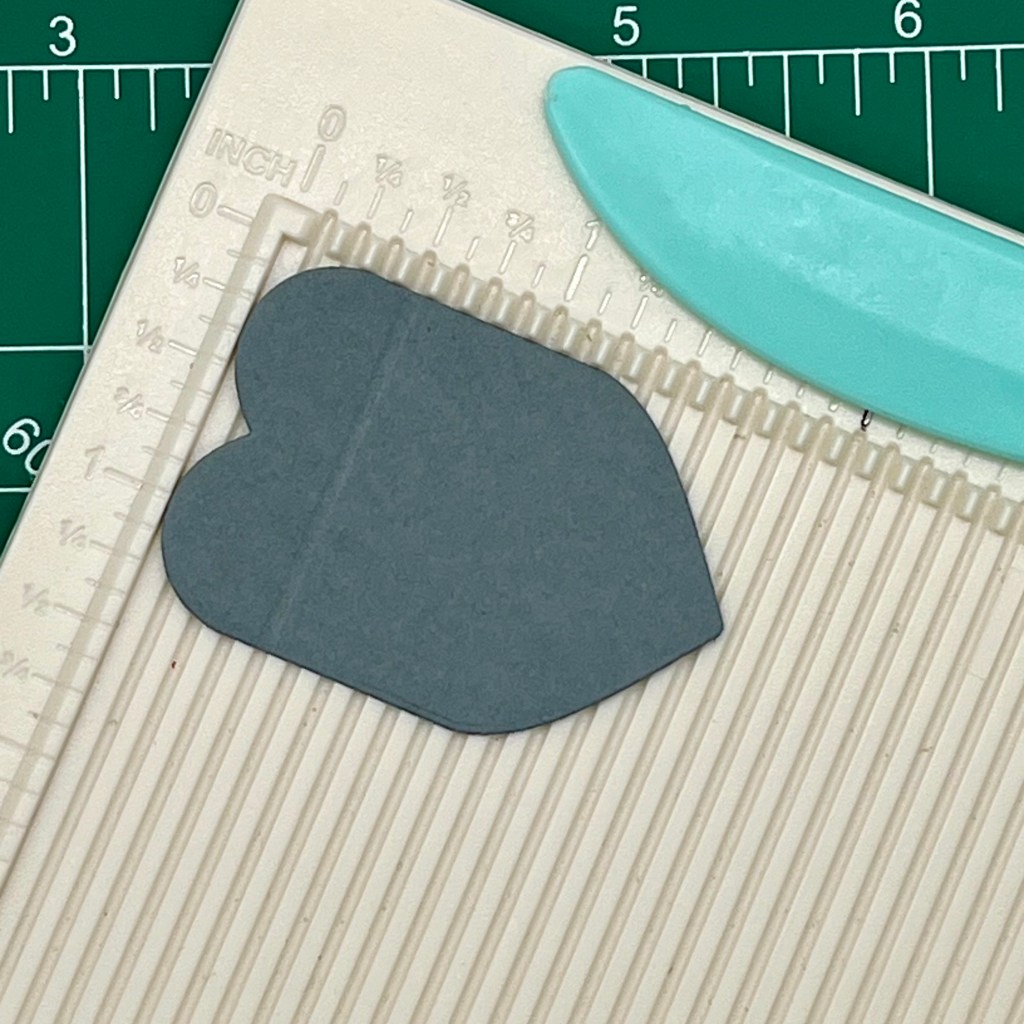
Line up one of the flat sides of one of the base pieces on a score board, and score it at the 1/2″ mark. This will be the back piece of the bookmark.

Step three:

Adhere the heart and the sides to the other backing piece (the one that is NOT scored) When I made mine, I lined up and adhered the heart piece first and then added the side pieces. Next, adhere the scored piece to the completed front of the bookmark. You will only add glue to the small, rounded scored end. This creates the hinge for the bookmark to open and close.
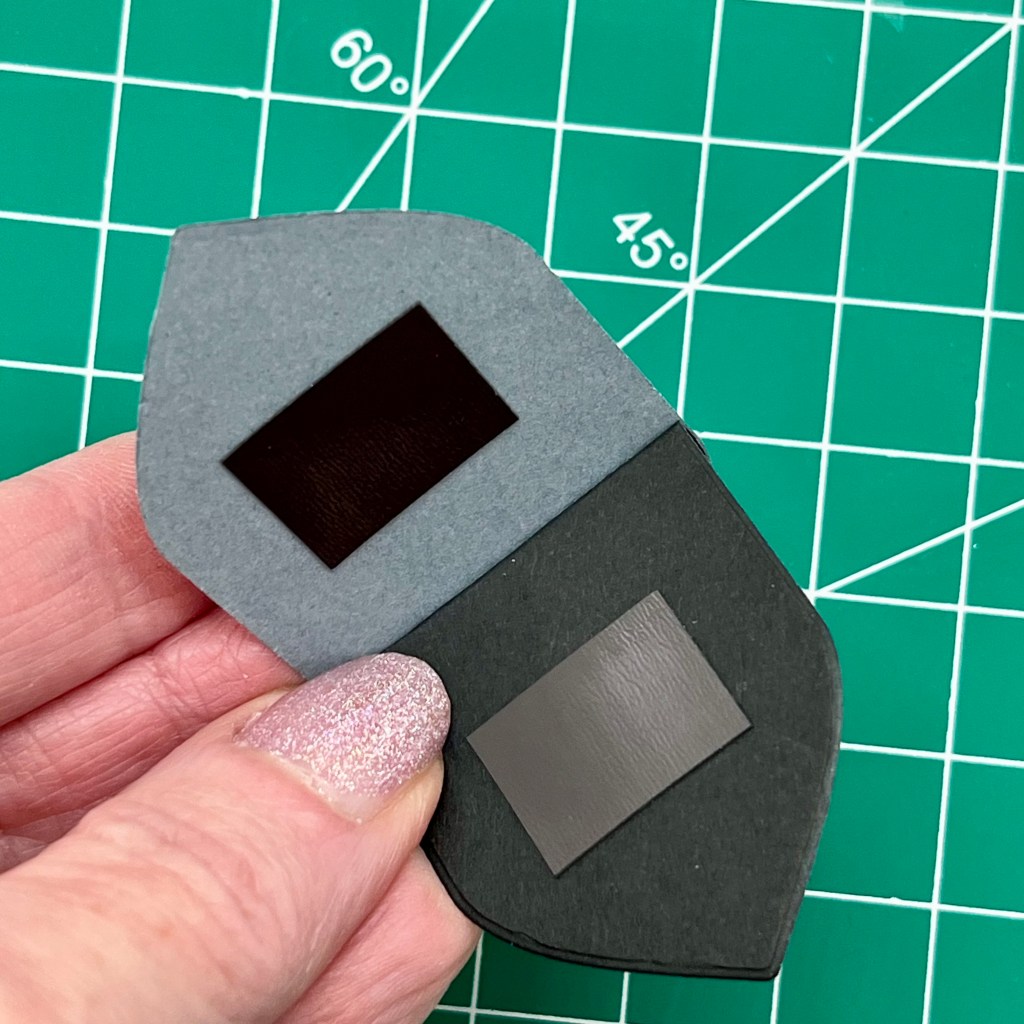
Step four:

While the bookmark is drying, cut a magnet strip approximately 1″ x 1/2″. Then, cut the magnet in half so you have 2 strips. Adhere one magnet strip on the inside of the bookmark. You can use liquid glue or strong adhesive tape. If using liquid glue, allow it to dry before glueing the other magnet in place. To adhere the second magnet, I “stuck” it to the glued magnet and added adhesive to the back. Next, I closed the bookmark and held it until the second magnet adhered to the bookmark.

Your bookmark should be complete and ready to use.

These bookmarks are really quick to make and would make a fun Valentine surprise for a friend or teacher.

I hope you will make some!

Thanks for stopping by!

Posted in Cardmaking

Just A Note

It is time once again for a new release from Simon Says Stamp. I feel like I say this all of the time, but this release is so fun!

I had the opportunity to create with the adorable “Right Stuff” stamp set.

For my first project, I created a fun, pop up, bridge card.

This was my first time creating one, but I was inspired by a video from Jennifer McGuire.

To create my card, I started with a piece of 110# card stock that measured 5 1/2″ x 10 3/4″. To acheive the pop up effect, I scored my card stock at 1 1/4″, 2 1/4″ and 3 1/4″. Then, I turned the card stock 180 degrees, and added score lines in the same spots. Next, I accordian folded (or zig-zag folded) on the score lines. Using a bone folder is very beneficial to acheive the crisp folds. Once folded, the card measures 4 1/4″ x 5 1/2″ and will fit in a standard A2 envelope.

I cut some standard, notebook paper to fit on the flaps and also on the inside panel. I cut them just a bit smaller to fit in each section. You could cut the two outside pieces to fit exactly and they would be 1 1/4″ x 5 1/2″. Next, I stamped the sentiment on the notebook paper that will be going on the inside panel. Then, I adhered all of the notebook paper and made sure the lines lined up.

I stamped two of the pencil images and colored them with Copic markers. These are the colors I used: RV23, RV21, RV01, E11, E33, C1, C3, C5,Y02, Y08, and Y19.

I fussy cut the pencil strips (I did not have the coordinating dies at the time) and decided on the placement of them. I used my trimmer to cut them to fit my card and adhered them to the card base.

Bridge cards are fun and easy to create and the recipient can display it easily as well. I plan to give this card to one of my teacher collegues.

Project #2:

I created a colorful bookmark for my second project.

I started by cutting 2 pieces of 110# white card stock to 2″ x 4 1/2″. Then, I stamped the group of pencils on one piece, and a single pencil and sentiment on the other, because I wanted my bookmark to have two completed sides. I colored the images with the following Copic markers: E11, E33, C1, C3, C5, R29, R08, R05, R14,YR09,YR07, YR04, YR12, Y02,Y08,Y19, YG09, YG05, YG03, YG07, BG49, BG45, BG32, BG11, B28, B26, B24, B21, V09, V06, V04, V01, RV66, RV55, RV32, RV11, RV25, RV23, and RV21.

Next, I adhered the two pieces of card stock together and punched a hole at the top. I added lots of ribbon from my stash to complete the bookmark. How cute?!?

I hope you enjoyed my projects and will check out the entire new release from Simon Says Stamp.

Below is my affiliate link. I hope you will use it if you see some things you need. Thanks for stopping by!